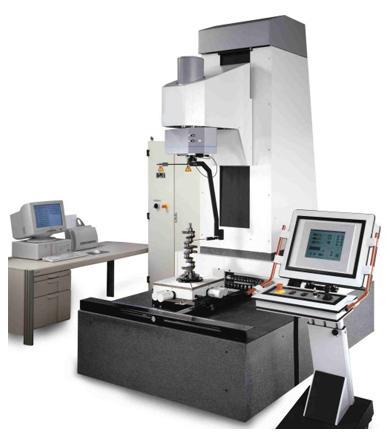
HOMMEL-ETAMIC FMS 8200
- Production:
- JENOPTIK Industrial Metrology Germany (Germany)
- HOMMEL-ETAMIC FMS 8200
Measuring station HOMMEL-ETAMIC FMS 8200 is designed to monitor all parameters of shape deviations and positional tolerances.
The special design with the spindle on which the measuring sensor is mounted and the five measuring axes is a very flexible solution for the automated measurement of all shape deviations and positional tolerances on large and heavy parts.
Features of the system:
- Automatic weight balance when turning the measuring sensor;
- Table on pneumatic bearings with the possibility of linear movement along the X and Y guides;
- For the automatic alignment of the workpiece in the X and Y guides, the A and B axes are integrated;
- X, Y and Z axes with a straightness measurement function;
- Five measuring axes, two alignment axes, and additional axes for measuring V-shaped motor blocks;
- Automatic adjustment of the measuring system to the diameter of the workpiece.
System benefits:
- Fully automated measuring cycle with extensive analysis capabilities for TURBO FORM software;
- Ideal for cylinder blocks, gearboxes, crankshafts, large diameter pistons, etc .;
- Mobile control unit for easy management of the entire system;
- Comprehensive anti-collision protection for longer life and increased productivity;
- Automatically switch the measurement direction for different tasks at a time;
- Easy change of workpiece due to wide measurement and movement ranges.
Specifications:
| Measuring range | |
| Max measured diameter, mm: | 300 |
| Max measured height, mm: | 1250 / 1500 * |
| Max. rad. distance, mm: | 210 |
| Axis of rotation (axis С) | |
| Table size, mm: | 600 × 450 |
| Aligning the part: | automatic |
| Error deviation from the roundness of μm + μm / mm height measurement, mkm: | 0,1 + 0,0008 |
| Error of axial runout at μm + μm / mm radius, μm: | 0,1 + 0,0008 |
| Type of bearing: | pneumatic |
| Max load, N: | 3000 |
| Maximum rotation speed, rpm | 12 |
| Resolution, °: | 0,01 |
| Positioning accuracy, °: | 0,1 |
| Vertical axis (axis Z) | |
| Measuring range, мм: | 1300 |
| Straightness error / 100 mm, μm: | 0,3 |
| Straightness error in the whole range, μm: |
2,6 |
| Speed of measuring, mm/s: | 16 |
| Speed of positioning, mm/s: | 25 |
| Positioning error / on all range: |
15 mkm / 1300 mm |
| Horizontal axis (axisR) | |
| Measuring range, mm: | 150 + 100 |
| Straightness error / 150 mm, μm: | 1,5 |
| Speed of measuring, mm/s: | 16 |
| Speed of positioning, mm/s: | 25 |
| Positioning error / on all range: |
5 mkm / 150 mm |
| The axis of movement of the table X (axisX) | |
| Measuring range, mm: | 800 | Straightness error / 100 mm, μm: | 0,3 |
| Straightness error on the whole range: |
1,6 mkm / 800 mm |
| Speed of measuring, mm/s: | 16 |
| Speed of positioning, mm/s: | 25 |
| Positioning error on the whole range: | 10 mkm / 800 mm |
| The axis of movement of the table Y (Y axis) | |
| Measuring range, mm: | 300 | Straightness error / 100 mm, μm: | 0,3 |
| Straightness error on the whole range: |
0.9 mkm / 300 mm |
| Speed of measuring, mm/s: | 16 |
| Speed of positioning, mm/s: | 25 |
| Positioning error on the whole range: |
6 mkm / 300 mm |
| Dimensions / weight of the measuring system | |
| Length, mm: | 1704 |
| Width, mm: | 2250 |
| Height, mm: | 3316 |
| Weight, kg: | 7500 |
All accuracy characteristics are given in accordance with DIN 1101 and at a temperature of 20 ± 1 ° C.
Measured deviation from roundness with filter 0-15 S / r; 6 rpm; LSC.
Measured deviation from straightness with cutoff of pitch 2.5 mm; 100 mm / min; LSS.
*-by order;
See also:
- HOMMEL-ETAMIC F50
- HOMMEL-ETAMIC F135/155
- HOMMEL-ETAMIC F435/455
- HOMMEL roundscan 555
Equipment for measuring deviations from roundness and shape (FORMLINE)
Downloads:
Description and technical specifications
- Линейка кругломеров серии FORMLINE. Язык - английский. (pdf, 2`906 Кб)


